
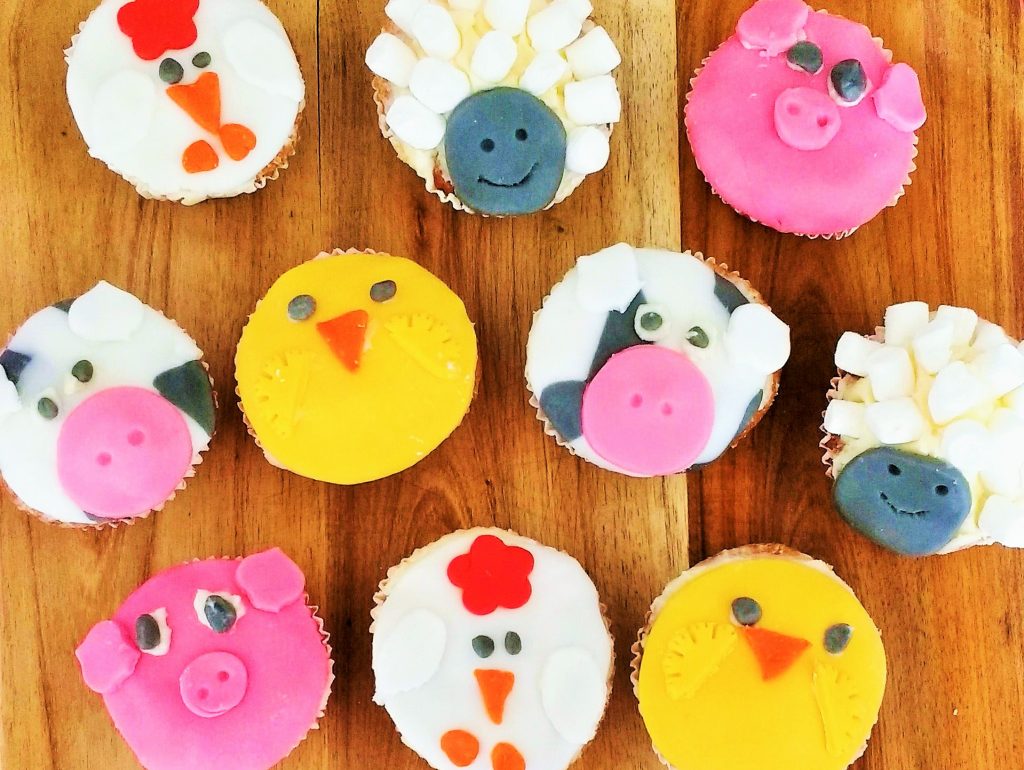
Farm Animal Buns for Beginners
My 5yo and I made some Farm Animal Buns recently as part of our school holiday Farm Week. It was great fun and really simple to do.
These are the plans I sketched up (please excuse the drawing!)
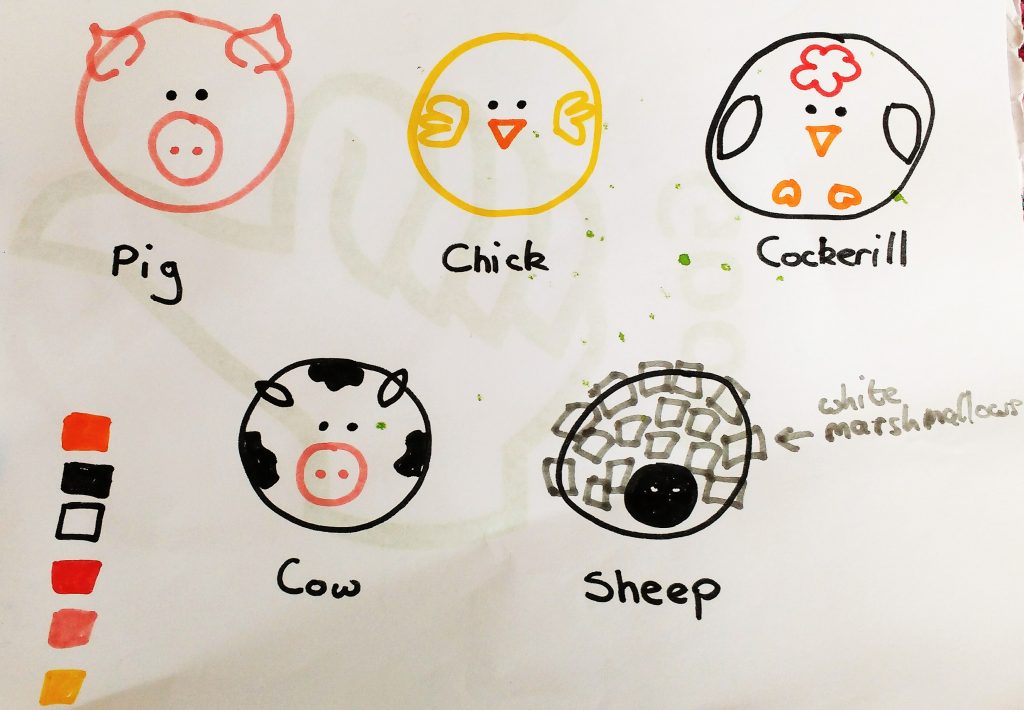
The plan!
You will need
Round cookie cutter
Icing cutters (we use this set)
Ready-made white fondant icing (supermarket own-brand is fine)
Food colouring (we use this set)
Palette knife (not essential)
Rolling pin
Icing Sugar
Butter
Milk
Plain Buns
Preparation
Bake buns beforehand
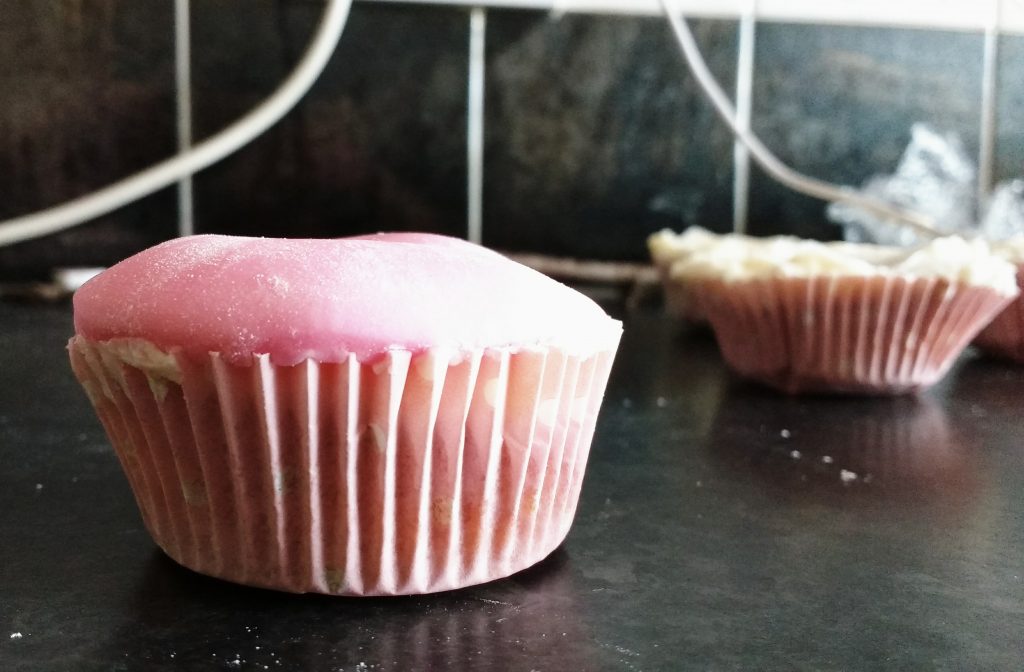
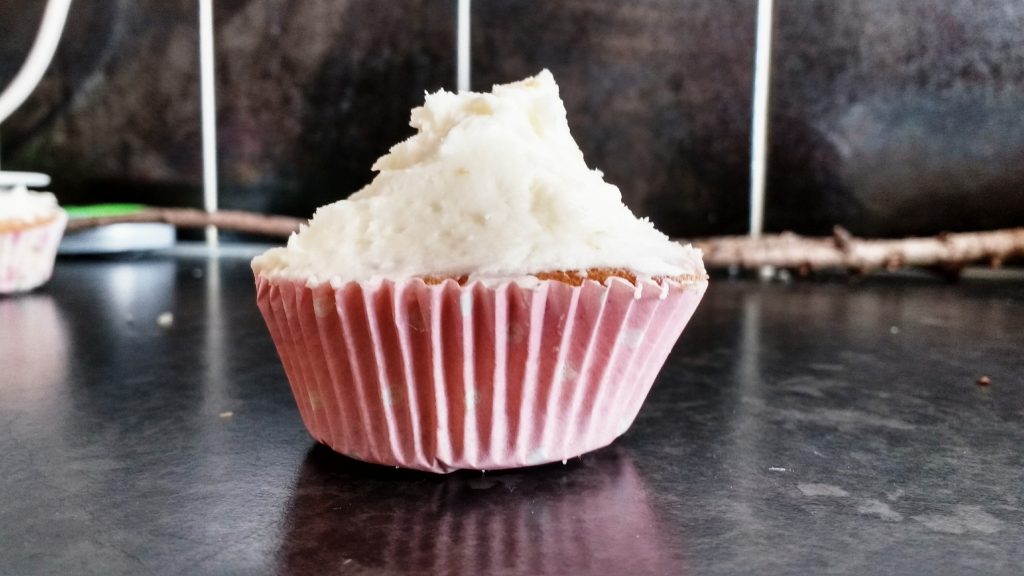
I definitely recommend baking and decorating them on 2 separate days. The decorating alone took about 1 ½ hours (it would be much quicker without a 5 year old involved but hey ho!). We used a simple vanilla cupcake recipe. Once the buns are made, you can freeze them until you’re ready (they should be OK for a good 4 weeks in the freezer).
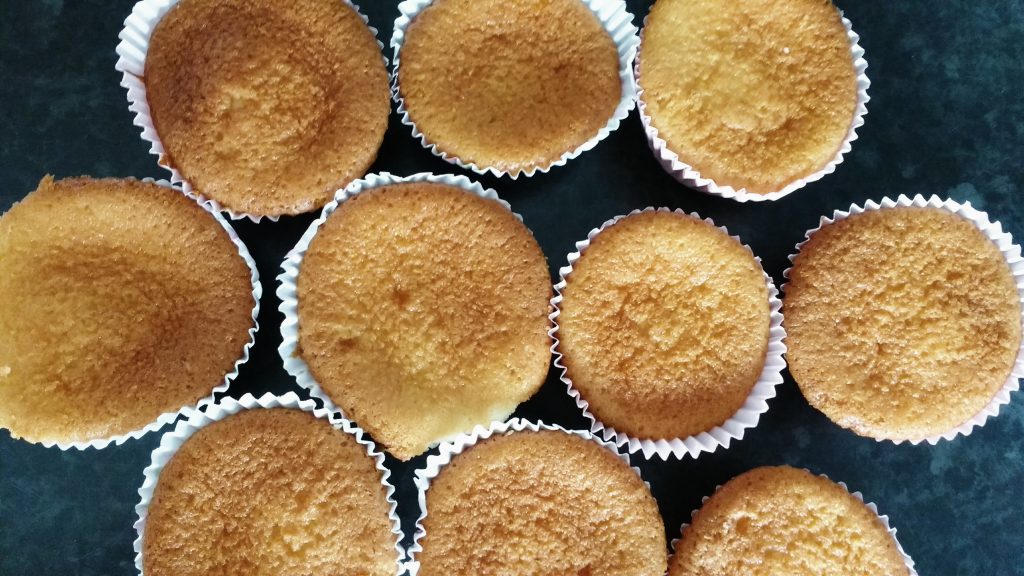
Vanilla buns defrosted and ready to go
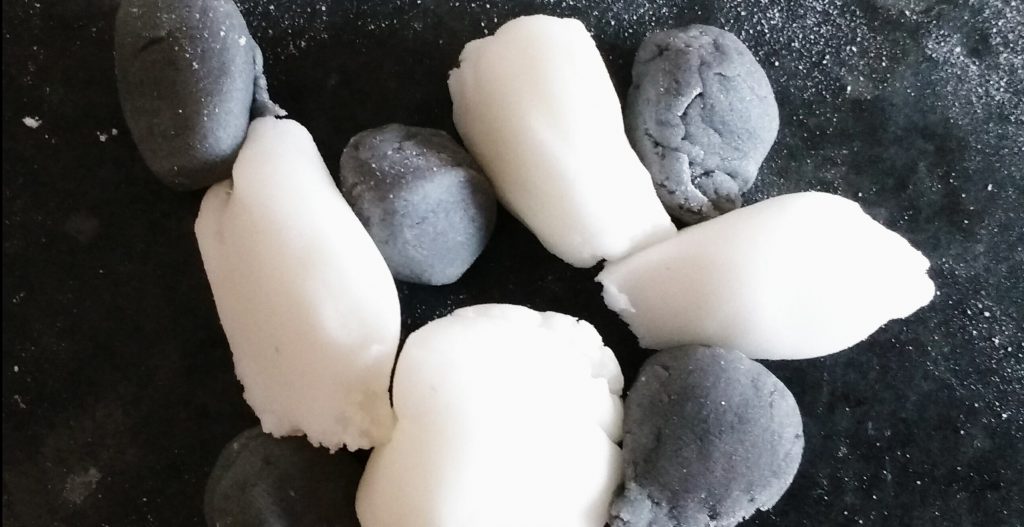
Colour fondant icing
Again, I’d do this the night before. Mixing food colouring and children is just asking for trouble!
Just pull off as much fondant as you need and squash it around for a bit. Then dip a cocktail stick into the colour you want and wipe it into the fondant. Keep folding and squashing the fondant until it is coloured through.
Wrap the coloured balls in cling film and leave in the fridge.
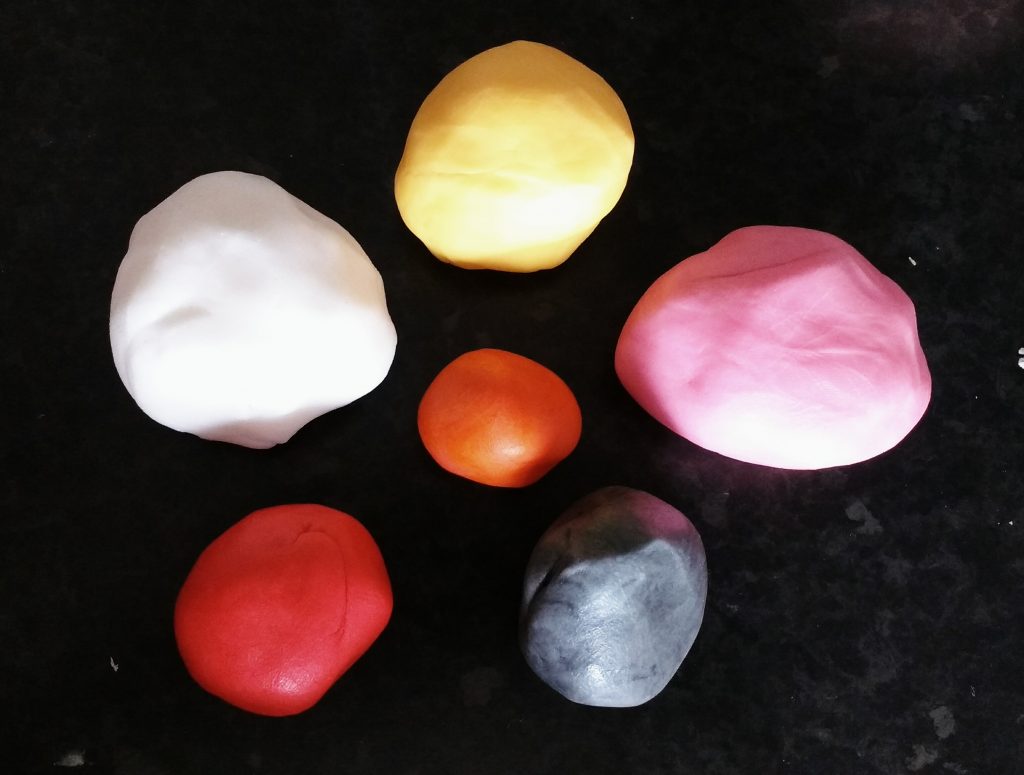
Make your colours up the night before (we had to mix red and yellow to make the orange)
Make butter icing
Butter icing is simple; weigh the butter and then add twice as much icing sugar. Beat it together (preferably with an electric whisk unless you’ve got the muscles of a body builder!). Add milk to soften if necessary.
Make the Farm Animal Buns
I’m going to talk you through making the pig as an example.
Make the butter icing foundation
Put a dollop of butter icing onto each bun and smooth it off until it’s flat (ish). I use a small palette knife but the back of a table knife should be fine too.
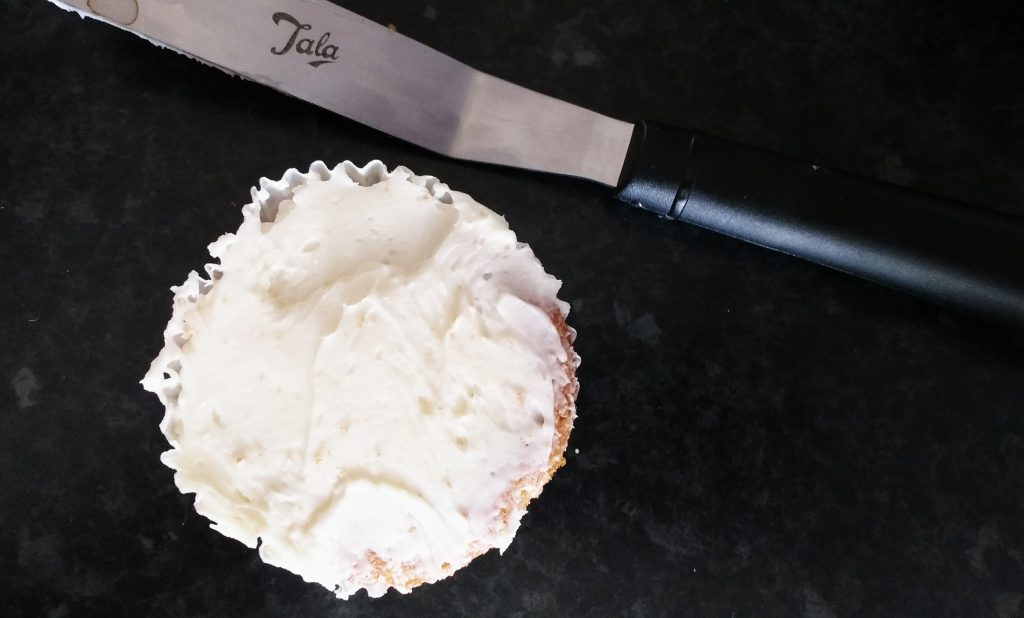
Smooth the butter icing onto the bun
Make the fondant icing disc
Sprinkle some icing sugar onto your bench to stop the icing sticking to it. Roll out the pink fondant until it is about 3mm thick and use a round cookie cutter to cut out a disc. Use one that is slightly bigger than your bun.
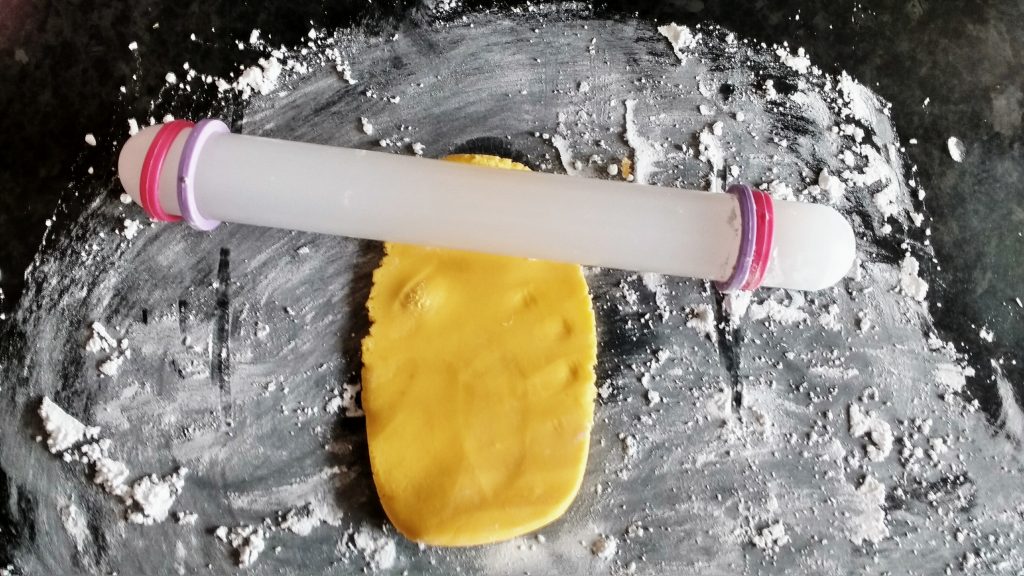
Roll out the fondant onto icing sugar
Use a spatula to pick up the disc and place it on your bun. Gently press the edges into the bun.
Place the disc on the bun and tuck the edges in
Make the fondant features
Eyes: Pinch a tiny blob of black fondant for each eye and roll them into balls
Nose: Cut out a small circle for the snout and put 2 small dint in it for the nostrils
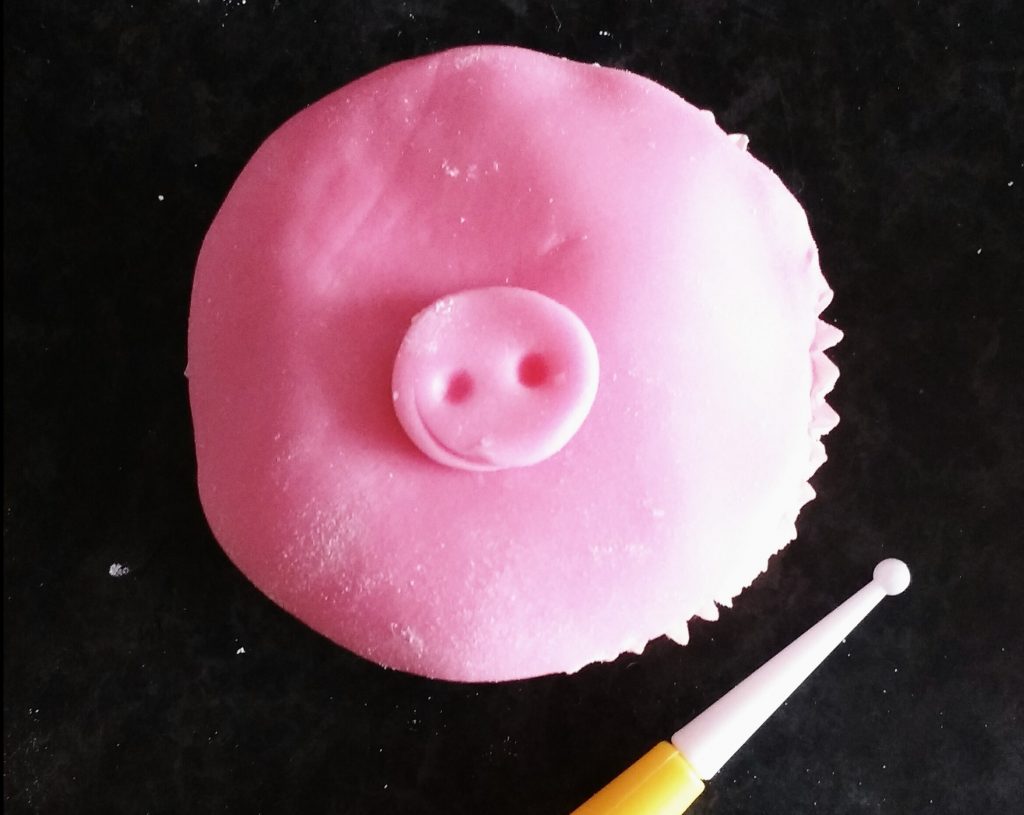
Pig nose
Ears: Use a flower icing cutter and then chop it up to make ear shapes
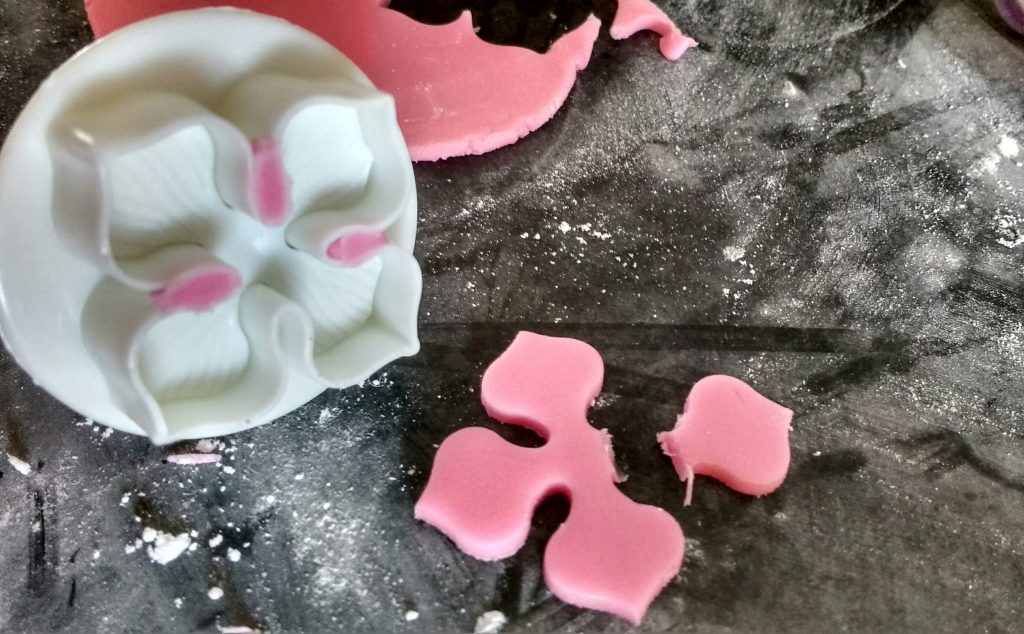
Pig ears
Attach the features
Butter Icing is the glue in this activity. Smear a tiny bit on the back of each piece, place on the disc, and then pat it gently so it sticks.
You’re done!

Finished pigs
Additional Extras
The cow disc
You might have noticed the cow disc is a mix of 2 colours. Don’t panic! All you need to do is roll a few pieces of each colour and arrange them closely together on your bench. Then roll them out with your rolling pin and they should merge together. Then cut out your disc as normal.
Arrange the coloured balls closely together
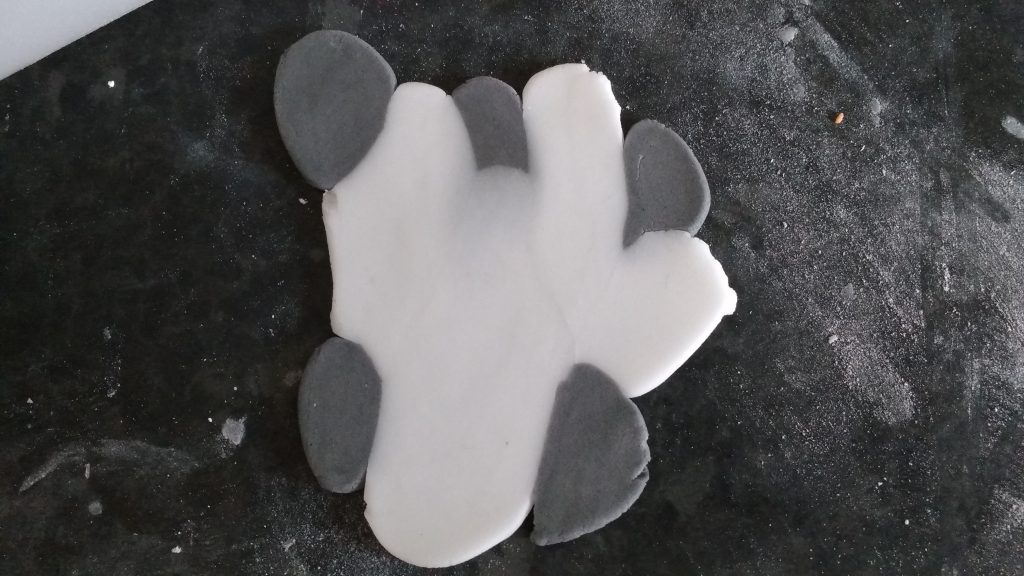
Use the rolling pin to merge them together
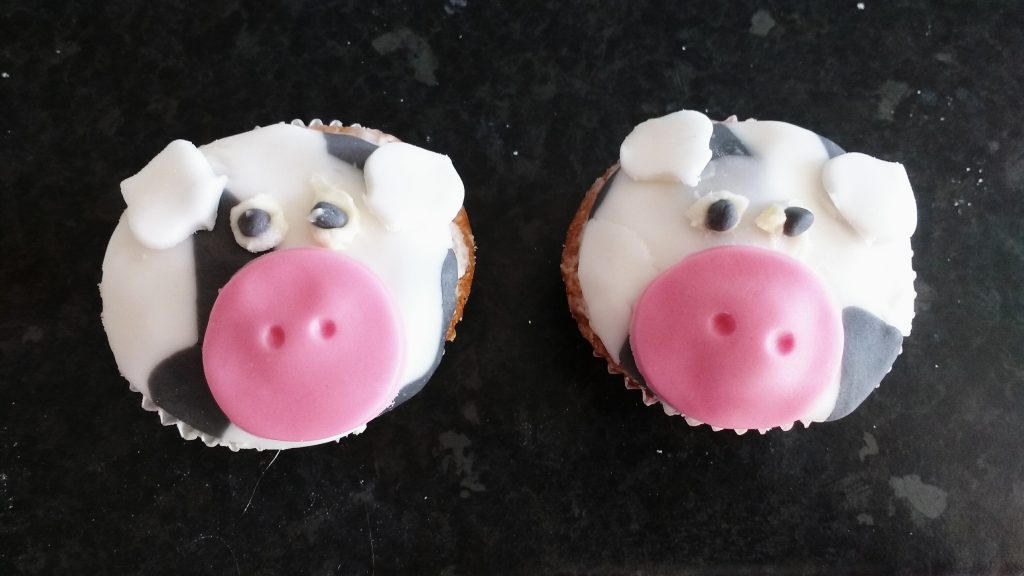
Cows
The sheep
No set of farm animal buns would be complete without a woolly sheep! The sheep is made by using more butter icing at the beginning and heaping it up into a little dome shape. Stick the black face on and then push mini marshmallows into the butter icing. Simple!
Heap the butter icing into a mound
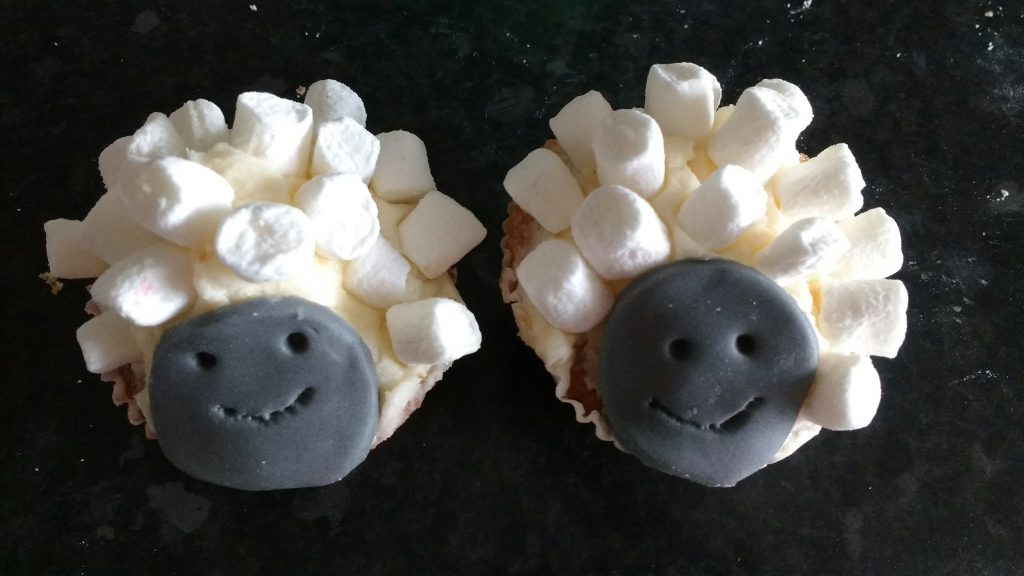
Sheep
That’s it! Easy Peasy!
Farm Animal Buns: Step-By-Step
Now you know what to do, here’s a snappier version of the steps for you to follow:
- Bake buns beforehand
- Colour fondant icing the night before, wrap in clingfilm, leave in fridge
- Make butter icing
- Put a teaspoon of butter icing onto the bun
- Use a spatula (or knife) to make the top flat and smooth
- Roll out the pink fondant icing and use a round cookie cutter to make a pink disc and place onto a bun
- Cut a smaller circle for the snout and put 2 small dints in for the nostrils
- Dob a tiny amount of butter icing onto the back and stick into onto the bun
- Roll 2 small black balls for eyes and mount on the bun with butter icing
- Use a flower icing cutter to make the ear shapes and such to the bun with more butter icing
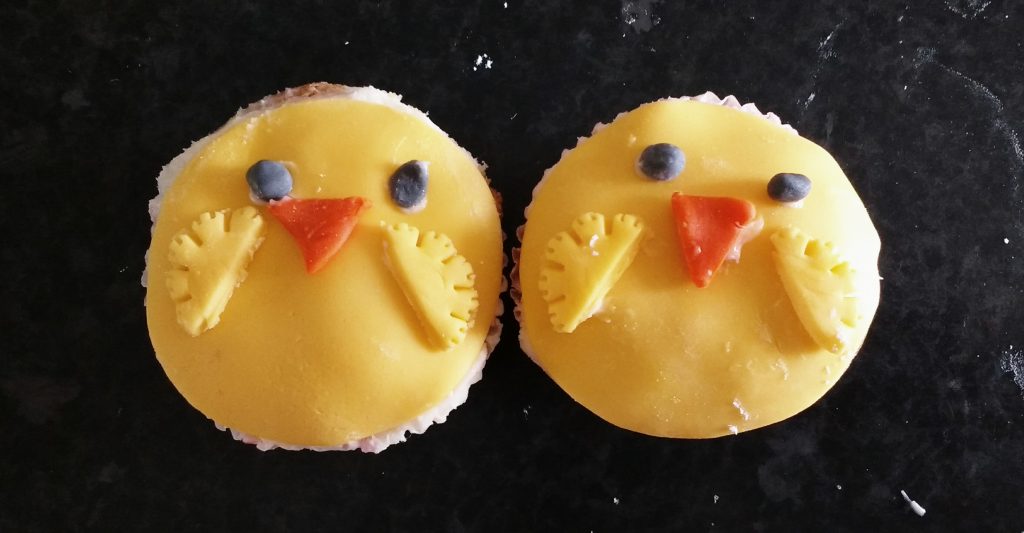
Ducklings

Chickens
Got an In The Night Garden fan? Why not have a look at my tutorial to make these fab cupcakes:
This post has been entered in the following linkies:


I’m loving the marshmallow sheep!
#ablogginggoodtime
They were my 5yo’s first choice to eat! So easy to make too. Thanks for leaving a comment. L
Wow! I love this idea. I have some spare colourful fondant. I know how I’m going to use it now 🙂 Thanks for sharing. Kat x #coolmumclub
Oooh have fun! I’m sure yours will turn out better than mine (this is only the 3rd time I’ve ever used fondant icing so I’m definitely still learning).
Oh wow these are ridiculously cute! Not sure if these are beyond my skills but love them all the same. Thanks for linking up to #coolmumclub lovely x
I’m so glad you like them. It’s the first foodie-type post I’ve done. I’m sure they’re not beyond you (this is only the 3rd time I’ve ever worked with fondant – it’s a lot easier than it looks). Thank you for commenting. L
Ah these are fab! I love the cow ones, so cute x #coolmumclub
Thank you. I like the cow ones best too!
These look fab. My favourite is the sheep. Thank you for linking up to #ablogginggoodtime
Thank you. The sheep were the simplest of all but I’m really pleased with how they turned out. Thanks for commenting. L
Oh these are beyond cute, I think even I might be able to manage to make these #PoCoLo
Yes I tried to design them to be simple shapes so that they would be easy to do. The cutters I suggested are really cheap too so they make it easier still. Thank you for leaving a comment. L
Ooh these look adorable and delicious. I think my favourite is the chicken! #ablogginggoodtime
Thank you! I like the chicken because the colours stand out so well on the white background. Thank you for commenting. L
I am loving these – we made marshmallow sheep cakes last week, but now I want to try all of the others! #thelist
Marshmallow sheep are brilliant, aren’t they! So simple but so cute! If you have a go at the others, I’d love you to send me a pic 🙂
I love these Lucy! The sheep are my faves! #pocolo
Aaaw thank you, Claire. The sheep are so cute and definitely the easiest by far! Thank you for leaving a comment. L
They look so good, please could I come to your house and eat them? 🙂
Haha! They’ve all gone, I’m afraid. They barely lasted long enough for me to take the photo!
I letrally just came from a cake sale and I donated some cakes, Pretty plain as compared to these pretty ones. My fave is the sheep and next time theres another cake sale I would do the sheep one cuz its so gorgeous! #pocolo
Yes the sheep are so simple but effective. I hope they turn out well 🙂
Oh wow! I love these. So cute! I love the sheep. The marshmallows work so well x
Thank you! Yes the marshmallows are so easy to use but they look so cute. Pushing them into the butter icing was my 5yo’s favourite bit 🙂
These are so cute! Me and Leo love baking so we will definitely be giving these a try. I love the cow!xx #coolmumclub
LOVE these, Noah’s going to be having a farmyard birthday party in December so I think I’ll have to save these for then.
#MarvMondays http://babiesandbeauty.com
Oh I hope Noah enjoys his birthday party, and I’d love to see a photo if you make some of our buns! Thanks for commenting. L
So cute! The sheep are my favorite!
From the comments, I think the sheep seem to be the most popular! They’re the simplest too which is great 🙂 Thank you for leaving a comment. L
These look so cute!!! Pinned to make later 🙂 (via #twinklytuesday)
Thank you 🙂 Have fun! And thanks for leaving a comment. L
I love these, they’re so cute! I love the sheep ones the best, what a great idea to do! #marvmondays
Thank you! The sheep were honestly so easy to do! Thank you for commenting, Kat. L
The sheep are awesome!! And we like your drawings 🙂 such a good receipe and guide, we’re going to try this at home! #TheList #TwinkyTuesday xx
Hehe you must be the first person in my life to ever say they like my drawings! I’m definitely not an artist but it serves the purpose here. Let me know how goes if you try them out 🙂
I adore these! Especially the pigs! Love the marshmellow sheep too! #MarvMondays
I’m glad you like them. They were so much fun to make (and eat!). Thank you for commenting. L
[…] particularly looking forward to decorating the cupcakes on Tuesday (find step-by-step instructions here). I’ve already baked the cakes and put them in the freezer so that we can straight on with the […]
They look great! Thanks for linking up to #TheList x
Aaaw thank you! And thanks for popping by 🙂
Mygirls would love doing this! This one is getting tucked away for the next holiday break for sure.
#brilliantblog
My daughter loved it – it’s like playing with playdoh, but with the added bonus of it being edible! Haha!
These are so cute. The little piggies are adorable x
Hehe I’m glad you like them 🙂
Wow they are so fab!
Thank youuu! They were really fun to do 🙂
These look great and so much fun! Love the sheep! #thelist
Thank you. They’re my 5yo’s favourites too so we made a whole flock of them the other day!
i absolutely love these – and have pinned them too. Love your drawings, and love how you’ve made a plan for them too. did I say I loved them??? Thanks for sharing with #PoCoLo
Aaaw thank you, Stephanie 😀
I don’t really work well on a spontaneous basis – I like planning! Hehe!
My youngest daughter has been wanting to bake cakes, so this is a fab idea that we can do! #MarvMondays
Oooh I hope you have lots of fun! Thank you for commenting. L
Love this, looks great and easy to do (which I need – anything manageable haha). My biggest would love making these I’m sure (if he doesn’t scoff the icing before we decorate). Thanks for linking up to #MarvMondays. Kaye xo
That’s definitely one of the pitfalls. I usually end up grazing so much on the icing that by the time they’re made, I just can’t face eating them! Ha!
[…] Psst! For my simple Farm Animal Buns tutorial, click here […]
[…] images are printed onto delicious fondant icing (and regular readers will know what a fan I am of fondant icing). Being a house full of girls (well hubby lives here too but he’s very outnumbered), we had to […]
[…] fab stories that have been featured in our guest blogger series, Bloggers Bluff? Oh and we loved designing cupcakes, didn’t […]
[…] of the current Lucy At Home series on party planning. So far we have covered kids party games and cake decorating. Over the next few weeks, we’ll also be looking at how to throw a party on a tight budget, and […]
[…] 10. Decorate some buns […]
[…] Farm Animal Buns For Beginners […]